
A good speaker cabinet is basically an air spring. The box volume, driver, and port are all tuned around the assumption that the enclosure is sealed everywhere except the places the designer intended. Once joints open up or old gaskets crumble, air sneaks out, bass gets soft or noisy, and you hear odd hissing or chuffing at higher levels. The fixes are usually simple—clean, seal, and re‑gasket—but only if you find every leak and use the right materials.
The Classic Speaker Pages community, specializing in vintage speaker restoration, strongly advises against using hard, non-pliable sealants and instead recommends using a malleable material like rope caulk (such as Mortite or plumber’s putty) placed around the perimeter of the driver flange.
This compound provides an effective, long-lasting acoustic seal that is also easier to remove later without risking damage to the old wood baffle or delicate driver frame, a technique they note is superior to replacing hardened foam gaskets.
Finding the Leaks
Start by pulling the grille and drivers so you can see the inside seams and hardware. With the speaker reassembled enough to play, run a low‑frequency test tone or some bass‑heavy music and gently feel around seams, corners, and cutouts for moving air; tiny leaks often show up as faint whistles or “spraying” sensations at higher SPL. You can also press lightly on the cone of a disconnected woofer—on a well‑sealed box the cone should move back slowly and feel springy, whereas a leaky cabinet lets it move more freely and return quickly.
Pay particular attention to:
- Cabinet joints and corners.
- The driver cutout and any old foam or gasket tape.
- Amp cutouts, jack plates, handle recesses, and port flares.
Anywhere you see hairline gaps, staining from moisture, or crumbling sealant is a candidate for rework.
Resealing Seams and Hardware
For gaps along internal wood joints, many builders run a bead of wood glue, construction adhesive, or hot glue along every interior seam; the glue wicks into little voids and hardens, both strengthening the joint and sealing micro‑leaks. For visible cracks or small corner gaps, a thin bead of acrylic or latex caulk on the inside is usually enough—easy to apply, easy to remove later if you need to modify the box.
Around amp cutouts, terminal cups, or handles, flexible sealants like silicone, rope caulk, or window sealant strips are common because they stay pliable as the cabinet flexes. If you use silicone near drivers, let it cure fully outside the box before reinstalling speakers so fumes don’t attack foam surrounds or adhesives. After everything dries, repeat the cone‑push or low‑bass test to confirm the leaks are actually gone.
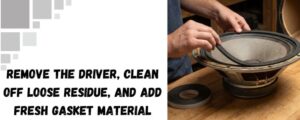
Re‑Gasketing the Drivers
Air slipping around the driver frame is a frequent hidden leak, especially on older cabs where the original gasket foam has flattened or turned to dust. The usual fix is to remove the driver, clean off loose residue, and add fresh gasket material—foam weather‑strip, purpose‑made speaker gasket tape, or non‑hardening putty rolled into a thin rope—around the rim before re‑installing the screws evenly. Done right, the material compresses to a thin layer when you tighten the driver, filling tiny irregularities without forcing the frame to warp.
If you can hear chuffing right at the cone edge at high levels, it’s also worth checking the surround and dust cap for small separations; those are cone repairs rather than cabinet leaks, and they call for appropriate speaker adhesives and patch techniques, not cabinet sealant. Fix the cone first, then worry about the box.
When Fixing the Box Stops Being Worth It
There’s a point where chasing leaks in a tired cabinet is more nostalgia than good audio practice. If the wood has swollen, delaminated, or gone soft from moisture, or if big sections of the baffle are cracked, you can seal air leaks and still be left with a box that rattles, flexes, and colors everything you put through it. In those cases, the drivers might be worth saving, but the enclosure itself has done its time.
Instead of Fighting Old Gear: Step Up Your Front End
If you’re already living with a flaky, ageing PA—noisy cabs, scratchy pots, leaky boxes—sometimes the smarter long‑term move is to stabilize the front end and routing instead of sinking more effort into wood and glue.
Product Highlights
5 Core 10″ Karaoke Machine Active Speaker
The 5 Core karaoke machine is a portable 10-inch powered PA system with built-in Bluetooth, USB/SD playback, and a mixer section, designed so users can run music and microphones without any extra gear. It includes two wireless microphones in the box, onboard controls for volume and tone, and a rechargeable or AC-powered design (model-dependent), making it ideal for home karaoke, small gatherings, kids’ parties, and casual singing where simple setup and flexibility matter more than raw SPL. You can roll it out, pair a phone, and start singing immediately, which aligns well with plug-and-play consumer usage rather than technical PA builds.

- Active 10-inch PA system with built-in amplifier and mixer.
- Bluetooth and media playback (USB/SD/AUX; exact inputs vary by revision) with 2 included wireless microphones.
- Designed for home karaoke, backyard parties, and easy transport, no external amp required.
Rockville RSG12 Passive Speaker
The Rockville RSG12 is a 12-inch 3-way passive PA speaker rated around 1000W peak / ~250W RMS, built for DJ and live sound use with a 12″ woofer, 4″ midrange, and horn-loaded tweeter in a carpeted wooden cabinet. It uses a high-power woofer with stiff suspension to handle strong bass, plus a piezo/horn high-frequency driver array, with rugged metal corners and pole-mount capability so it can be used on stands or in stacks for clubs, rehearsals, or mobile DJ rigs. Because it is passive, it requires an external power amplifier and typically a mixer, making it better suited to more permanent PA systems or gigging rigs than casual living-room karaoke.
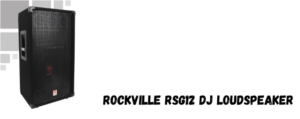
- Passive 3-way 12-inch PA cabinet, approx. 1000W peak power handling.
- 12″ woofer, dedicated midrange, and horn tweeter in a carpeted wooden enclosure with pole mount.
- Needs external amp and mixer; optimized for DJs, bands, and rehearsal spaces rather than all-in-one karaoke use.
Conclusion
Small air leaks in an old speaker cabinet can absolutely rob you of low‑end punch and add ugly hissing or chuffing, but they’re usually fixable with careful inspection, fresh sealant on the joints, and new gaskets under the drivers.
The bigger call is deciding when that effort still makes sense; once the wood itself is tired and the rest of the rig is outdated, sealing one more seam may not be as powerful an upgrade as finally putting a solid modern mixer like the 5 Core MX‑20CH‑XU or Harbinger LV14 at the center of your system.
Here you can also find amazing drum thrones; alternatively, browse our product page to find the best keyboard bench, audio mixers, drum mics, piano bench, keyboard stand, speakers, party speakers, and more.